
Webtop
Accessing XPipe remotely
Introduction
XPipe is a desktop application first and foremost. It requires a full desktop environment with various installed applications such as terminals, editors, shells, CLI tools, and more to function. A pure web-based interface for XPipe therefore does not fit very to this approach.
Since there is still demand to access your XPipe environment remotely for when you are not at your desktop, there exists the so-called XPipe Webtop for this. XPipe Webtop is a web-based desktop environment that can be run in a container and accessed from a browser or the mobile app. The desktop environment is based on KDE6 and comes with XPipe and various terminals, editors, and more tools preinstalled and configured. It also comes with an extension system to install necessary tools on-demand, for example, specific password managers or terminals.
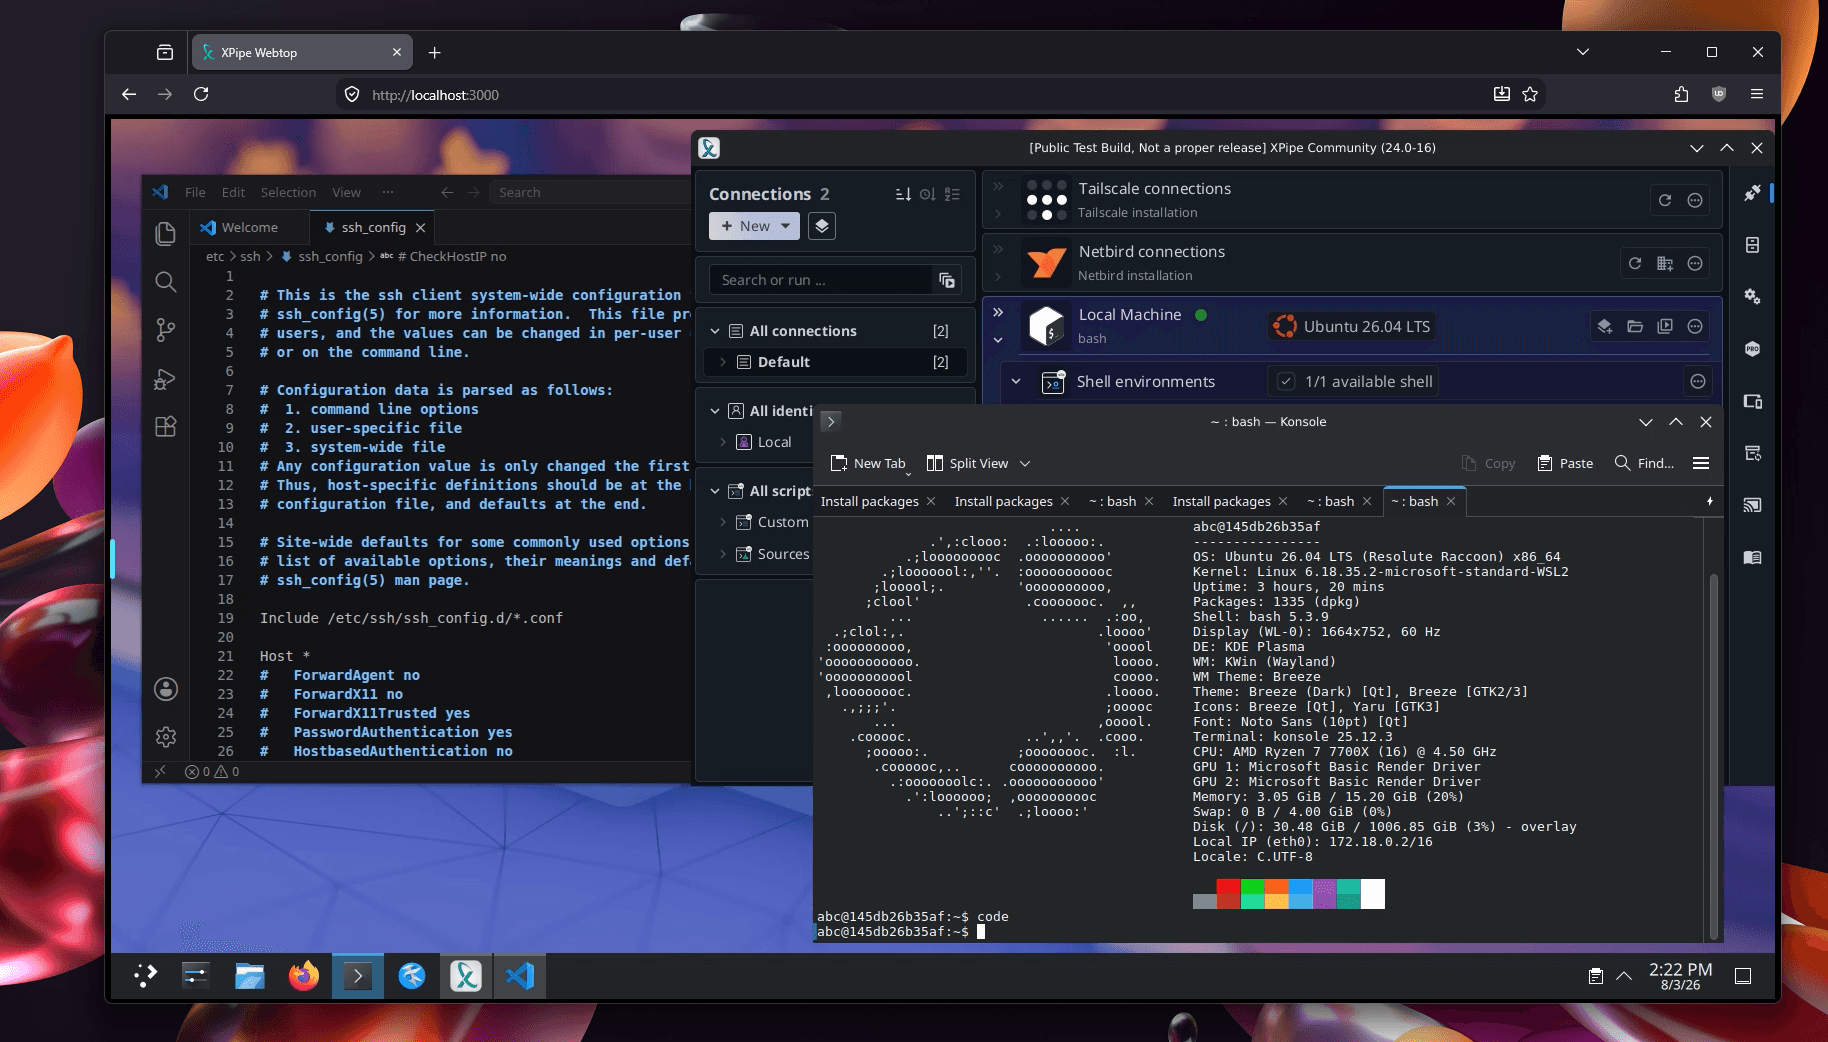
The container image is an OCI image, meaning that you can deploy it on any OCI-compatible container runtime. This includes docker, podman, and through the OCI compatibility layer also now Proxmox PVE 9+. You have the option to either use the deployment wizard to easily create a deployment for you, or alternatively use this page as a reference to deploy the container fully manually.
Wizard
You can open the deployment wizard from within the XPipe application:

To choose a valid deployment target, the server needs to be added to XPipe first. Then, you can choose it in the selector:
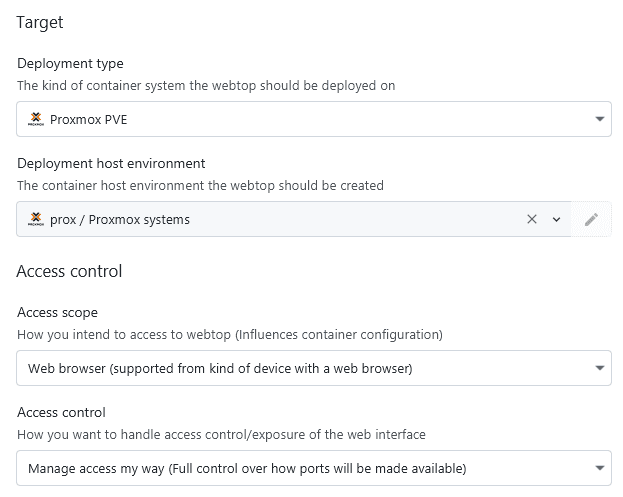
There you can fill out all the configuration settings for the webtop and create a deployment template. This template can then be automatically deployed to create a container on the target system.
Manual setup
You can also choose to set up the container manually if you prefer. This section covers all the steps for docker. Note that for Proxmox, the wizard is strongly recommended as the manual deployment of OCI images in Proxmox is still not a very polished experience.
The webtop image can be found at ghcr.io/xpipe-io/xpipe-webtop:ptb. All images can be found in the webtop container registry.
The webtop has the default ports to access the web interface at:
Compose file
Docker compose is recommended to deploy the webtop environment.
linux/amd64 and linux/arm64 platforms.services:
webtop:
image: ghcr.io/xpipe-io/xpipe-webtop:ptb
container_name: xpipe-webtop
hostname: xpipe-webtop
environment:
- XPIPE_VPN=none # See the VPN section below on what this does
- LC_ALL=en_US.UTF-8
- TZ=Europe/Berlin
- PUID=1000 # Set this to your user id to make the mounted volume use the same owner as your local user
- PGID=1000 # Set this to your user group id to make the mounted volume use the same owner as your local user group
volumes:
- /local/path/to/data:/config # Where to store the user data of the container
ports:
- 127.0.0.1:3000:3000 # HTTP, only accessible on localhost. When accessed not from localhost, it will complain about an insecure connection
- 127.0.0.1:3001:3001 # HTTPS
- 127.0.0.1:21222:21222 # SSH (optional, see below)
- 127.0.0.1:21721:21721 # API (optional, see below)
restart: unless-stopped
shm_size: 256mb # Some apps in the webtop use a lot of shared memory, so this needs to be increased here from the default value
cap_add:
- NET_ADMIN # Optional, see the VPN section below
privileged: true # Optional, see the VPN section belowAuthentication and access
By default, there is no authentication enabled and the webtop will be available to anyone who can access the container. So you have to be careful not to publicly expose it in that state. This section summarizes the various possible modes of operation:
Local network
If you can only access the webtop within your local network, then you don't really have to do anything in terms of securing it
VPN
If your setup already uses a VPN like tailscale, netbird, etc., you can use it to control the access to the webtop interface that way. This is usually the easiest way. See further down below for setup instructions for VPNs for the container
Authentication layer
Alternatively, you can use a proper separate authentication solution in front of the actual webtop environment. You can use authentication providers like Authelia, Authentik, KeyCloak, and others to put in front of your webtop. This also allows you to expose the system publicly without the need for a VPN, assuming that you have set up your authentication system correctly.
Mobile app
If the primary use of the webtop is for you to access it from a mobile device when you are away from your desktop, then you can use the XPipe mobile app on Android and iOS. This app supports an SSH-only approach where only the SSH port needs to be reachable. The app will then connect via SSH key auth and tunnel the connection via SSH, making it secure to use.
This can then be publicly exposed as the SSH port is secured via a key that is only available to the mobile app. The mobile setup also supports using VPNs when they are configured for the container.
VPN configuration
You can add the container to a VPN if your VPN is supported. Currently supported are Tailscale and Netbird. You can enable this feature by setting the environment varible XPIPE_VPN=tailscale or XPIPE_VPN=netbird.
This allows you to connect to the container from within your VPN and also connect to other systems within your VPN from the container.
Tailscale
For tailscale, the container does not need to be privileged, but requires the host system on which the container is running on to have tailscale installed. This is required, otherwise the connectivity will not work.
Netbird
By default, a docker container does not have access to the network tunnel driver (TUN) on the host system. Tools like Netbird require the TUN to function within the container.
If you are planning to use Netbird for the container, you will have to pass the TUN device to the container and run it with privileged network permissions. Otherwise, the Netbird daemon won't be able to start. You can do this by passing the following arguments to the container:
--cap-add=NET_ADMIN --privileged
Language Support
The environment variable LC_ALL can be used to start this image in a different language. For example, to switch to the chinese locale, you can pass this additional environment variable:
-e LC_ALL=zh_CN.UTF-8The web interface has the option for "IME Input Mode" in the settings, which will allow non english characters to be used from a non en_US keyboard on the client. Once enabled, it will perform the same as a local Linux installation set to your locale.
API server
By default, the nature of XPipe and the git vault is decentralized, meaning that there isn't a central backend server to manage your vault. This makes it a bit complicated in enterprise environments where server changes should be propagated to a synced vault automatically, as there is no central server to send those vault update requests to.
You can choose to utilize the webtop container as a central API server that you can host to automatically update a synced git vault via API requests. To enable this, you will have to pass the environment variable XPIPE_API_SERVER=true to the container and map the port 21721 with -p 21721:21721. This makes the container listen on port 21721 to accept HTTP API requests. For more details on the API for automated connection and vault interaction, see the API page. The rest of the webtop will work normally, meaning that you will still have access to the graphical interface when the API server setting is enabled.
Usage
You will initially start out with an empty installation of XPipe. It is therefore recommended to use the git sync feature of XPipe to quickly transfer all your connections to the new webtop installation.
Initial configuration
When you create a webtop through the wizard, a webtop connection entry will automatically be added to the connection hub:

Alternatively, XPipe will also autodetect a webtop container when it is added manually when the relevant list of container entries is refreshed in the connection hub.
Once the webtop is added, you can transfer your local settings to the webtop system:

Also, if you want to have access to the system shell and file system of the webtop container or access the file system from the outside, you can use XPipe as normal from your desktop. The webtop container is just another container in the eyes of XPipe, so you will have easy access to it if you have access to the host and have added it to XPipe.
Data and programs
All your data is stored in your user directory in the container at /config, so you should therefore make it a persistent docker volume to preserve this data. You can also install further applications with apt, however, these will not be preserved on container rebuilds or upgrades as these packages are usually not installed into the user home. Only their configuration in the user dir will survive.
The XPipe webtop comes with the ability to install all supported programs automatically via the built-in package installer. This dialog will open whenever a package is required to be installed:
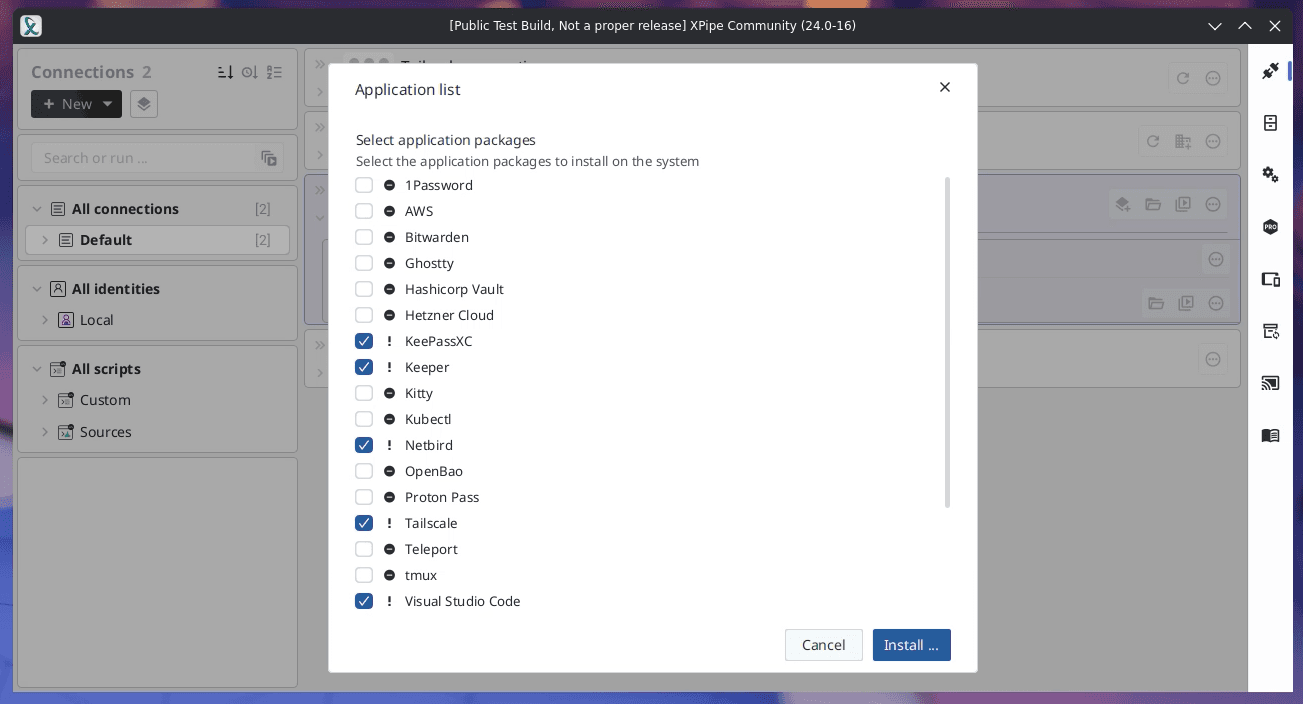
This will open a terminal which will install and configure the selected packages. XPipe might restart afterwards, and the programs will be available to you. XPipe will also remember which programs are selected, in case a container is rebuilt and data outside of the user home is deleted. This means that you can quickly restore your selected packages on container updates.
Screen settings
To control the screen and display settings, open the sidebar on the left:
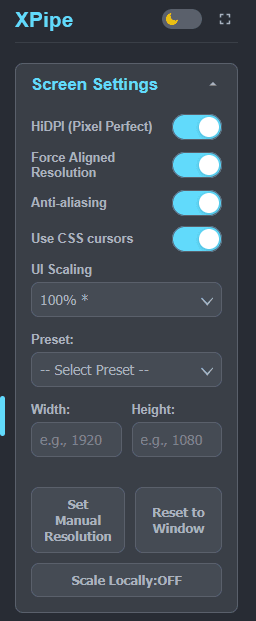
The most used setting for you will probably be the UI scaling setting. Changing this setting will change the dpi of the desktop environment, and the XPipe application will automatically restart to apply the new display scale.
Within XPipe, you can open the mode switcher to choose between mobile and desktop mode for XPipe and the desktop environment:

The main changes of these modes is the window handling within KDE and the display within XPipe.
Clipboard
The clipboard handling is dependent on how well your current browser supports it. It is recommended that you use a chrome-based browser, that way you will have the seamless clipboard where changes on both sides are instantly reflected.
If you are using Firefox, the clipboard is not as seamless. You can set the clipboard manually in the sidebar that you can expand on the left in the clipboard section. You also sometimes get a paste button when focusing the webtop, sometimes only after re-focusing the webtop twice. This button can also be used to set the clipboard when it shows up.
Updating
You can upgrade XPipe independently of the container image as usual in the settings menu or via the automatic updater prompt. An image update is only needed if there were changes made to the image. This information will be included in the changelog for XPipe updates.
An image update requires a container recreation to update it. This will destroy the volume, excluding the bind mount at /config for the user data. Since all relevant configuration is stored in this directory, you won't lose any user data if you created a bind mount for this directory.
Other system data, e.g. packages that you installed or upgraded yourself, will be discarded alongside the volume. XPipe will prompt you to reinstall any lost packages on relaunch, so after a few minutes, you will have the same system back again and working.
Update image:
docker-compose pull xpipe-webtopUpdate container:
docker-compose up -d xpipe-webtopYou can also remove the old dangling images:
docker image pruneOn Proxmox, the upgrade process is not as smooth as it does not have a similar system of bind mounts. You can recreate the container via the wizard and if needed, copy the contents of /config manually to the new container. You can do so with XPipe's file browser by opening both container systems and copying the dir to the new system.