SSH auth
The full reference for SSH authentication
Introduction
The SSH integration in XPipe is a core component as most remote connections to your servers are probably going to use SSH.
When establishing connections, XPipe delegates any form of connection and shell handling to your existing command-line SSH client available in the PATH, which is most likely the OpenSSH client. XPipe does not come with its own SSH implementation or other connection handling. Everything is fully realized on top of your installed CLI programs.
All authentication is also going through the OpenSSH client. The detailed behaviour and error messages are therefore also the same, meaning that any guides or troubleshoot instructions you can find for OpenSSH will also apply to XPipe.
Password authentication
To supply a password for the SSH authentication, you can choose out of multiple different password types:

-
None: Password authentication will be disabled
-
Password: You can choose to specify a password in-place, it is then stored in the XPipe vault.
-
Prompt: You can choose to supply the password at runtime, meaning that XPipe will ask you for the password on the first login. It will then be cached for the rest of the session, so you will only have to enter it once
-
Password manager: For a more managed approach, you can also retrieve passwords from your password manager. See the password manager documentation on how to configure this.
-
Custom command: The last option gives you the ability to run a custom command to retrieve the password, which can be useful if you have a self-built system for password retrieval. This will execute the command and read any password from stdout
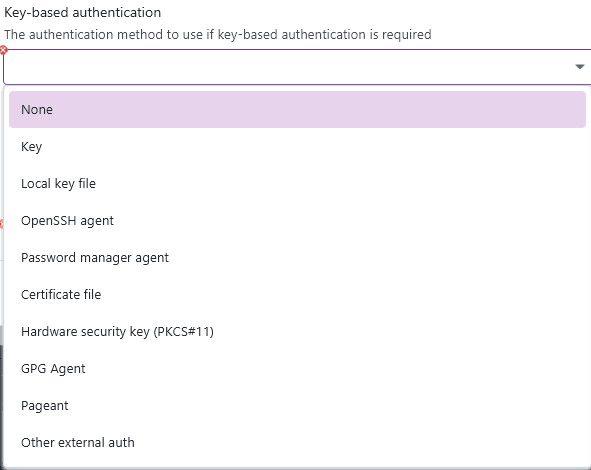
Key-based authentication
XPipe supports all established key-based authentication methods for SSH. Since it uses OpenSSH, any auth method supported by OpenSSH is also supported by XPipe, this includes key types like FIDO2.
By default, your selection will override any externally configured key. For example, if you have a local SSH agent running, XPipe will prevent it from supplying its keys unless you select the agent option here. This is to guarantee reliability when authenticating.
Many key selections also support passphrases. For passphrases, you have the same retrieval options as for passwords.
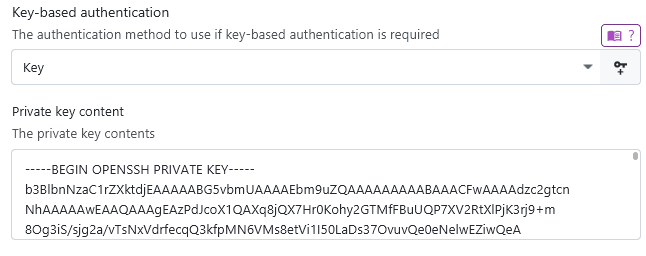
In-place key
With this option, you can store a keypair in text form in the XPipe vault:
If you don't have an existing key at hand and instead want to configure a new key for a system to authenticate with, you can create one in the keygen menu, which you can find at the keygen button:

This will open a dialog where you can configure the generation parameters for a new key. The keys are generated via the installed OpenSSH ssh-keygen CLI tool, so you can be assured that the keys are generated in a cryptographically secure manner. This also support FIDO2 smartcard-based keys:
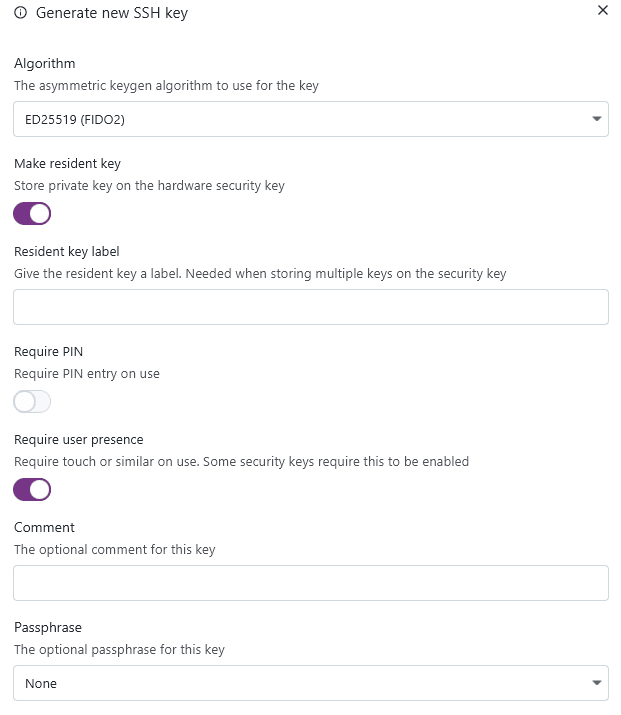
Once the key is generated, it will be automatically placed in the open connection configuration.
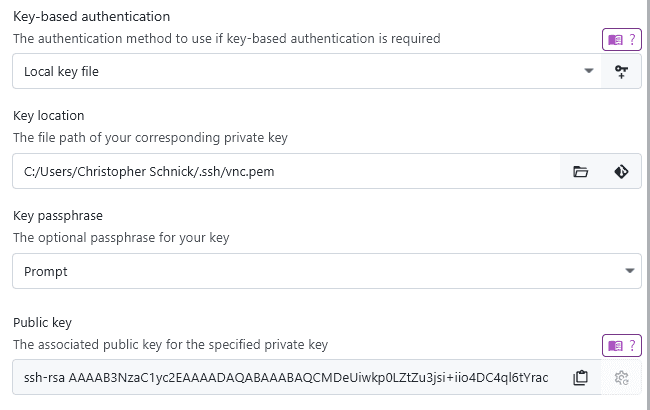
Local key file
You can also specify a key file that is located on your local file system. This option is the equivalent of ssh -i <file>. All key types that are supported by OpenSSH are supported by XPipe as well.
When the git sync is enabled, you have the option to sync the key file itself to the git repository as well:

You are then prompted to confirm adding a key to the git repository:
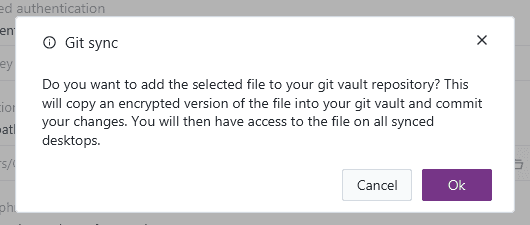
Any kind of key files are not added automatically to a repository and always require confirmation.
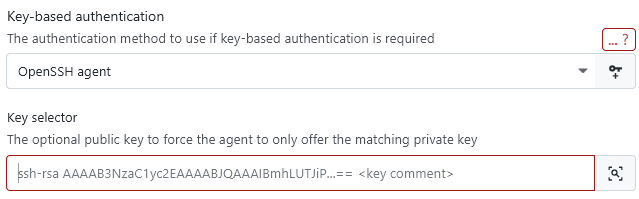
OpenSSH agent
In case your keys are stored in the OpenSSH agent, XPipe can automatically use them if the agent is correctly configured in the environment. The agent socket location is retrieved from the environment variables passed to XPipe or set in the local shell init files. You have the option to automatically list all available keys in the agent:
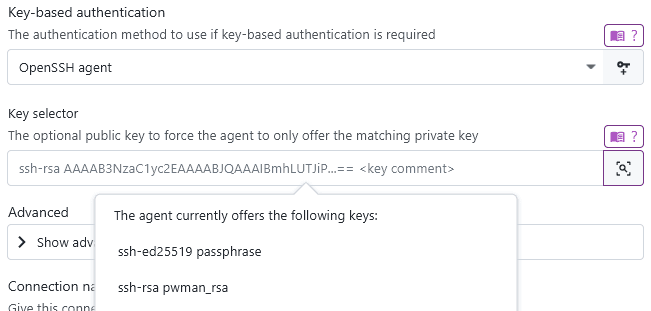
On Windows, XPipe will automatically start the agent process if it is not running yet. On other operating systems, you have to ensure that the agent is running.
If you are using any other agent, for example from a password manager, you can use other agent options instead.
Password manager agent
If you are using a password manager with an SSH agent functionality, you can choose to use it here. XPipe will verify that it doesn't conflict with any other agent configuration. XPipe, however, can't start this agent by itself, you have to ensure that it is running.
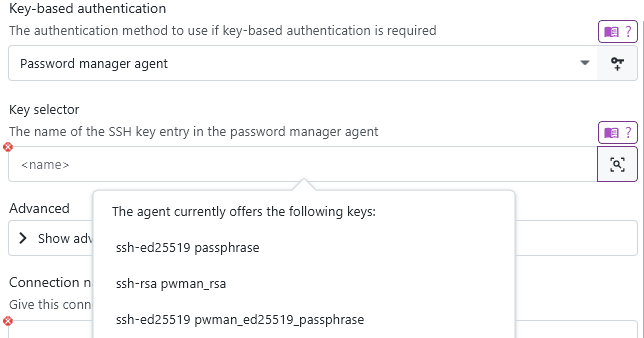
Some password managers support referencing keys by their name while others do not, so you need to check for your individual password manager. The advantage of using key names is that if the keys are changed in the password manager, the changes are automatically applied to XPipe as well. When referencing an entry using the public key, you will have to update the public key manually in XPipe.
For more information on how to configure this, see the password manager page.
You can use password manager entries as whole identities instead of just keys through password manager identities.
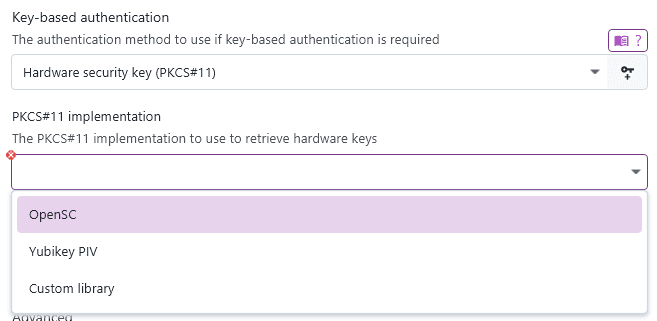
Hardware security key
If you are using a smartcard or security key that authenticates via Personal Identity Verification (PIV), you can use this option to supply those keys via PKCS#11 to OpenSSH. For this to work, you have to use an external PKCS#11 library, depending on which implementation you want to use:
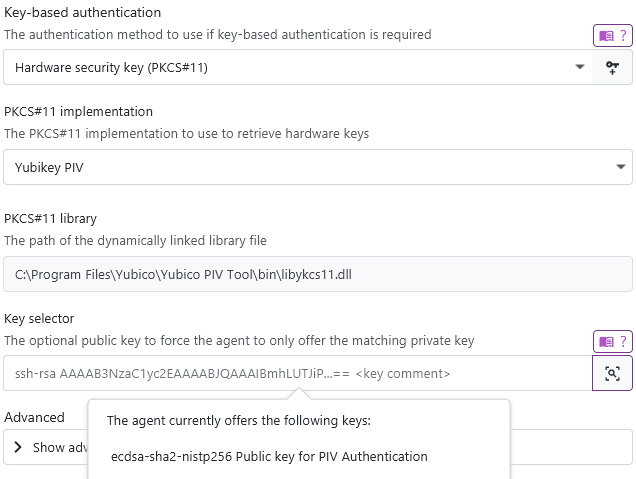
Yubikey PIV
If your identities are stored with the PIV smartcard function of the Yubikey, you can retrieve them with Yubico's YKCS11 library, which comes bundled with Yubico PIV Tool. Once this tool is installed, XPipe should be able to locate the library automatically:
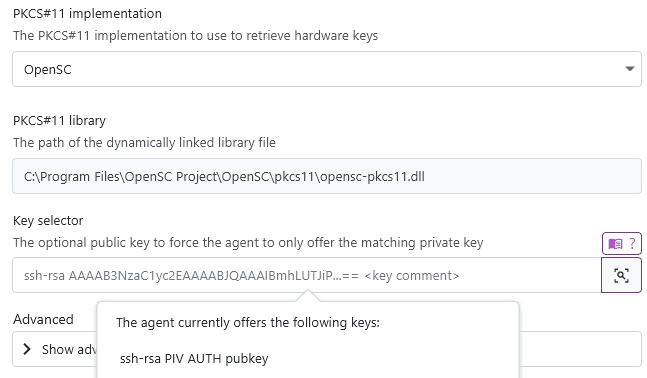
OpenSC
For many other types of security keys, the OpenSC library supports retrieving PIV keys. Once this tool is installed, XPipe should be able to locate the library automatically:
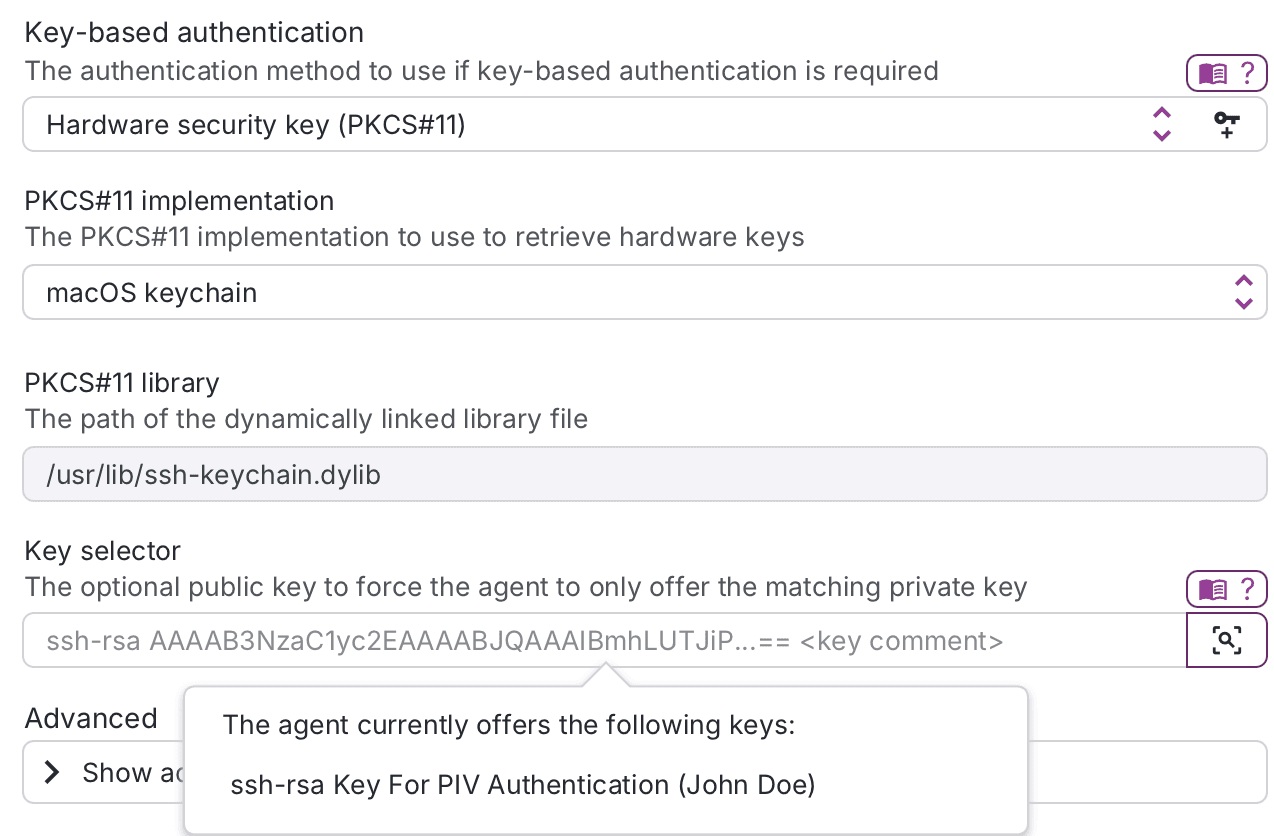
macOS keychain
On macOS, apple ships their own PKCS#11 library implementation to handle various smartcards and security keys, similar to OpenSC. You can select this option as well, however, it will only be available on macOS systems:
Custom library
If OpenSC does not support your hardware, you can still configure XPipe to use a custom PKCS#11 library supplied by the vendor of your smartcard/security key.
Certificate file
In an enterprise environment, you might deal with certificate-based authentication where user certificates are signed by a custom CA/intermediate X509 certificate. The server is then configured to accept keypairs whose public key is properly signed by this CA:
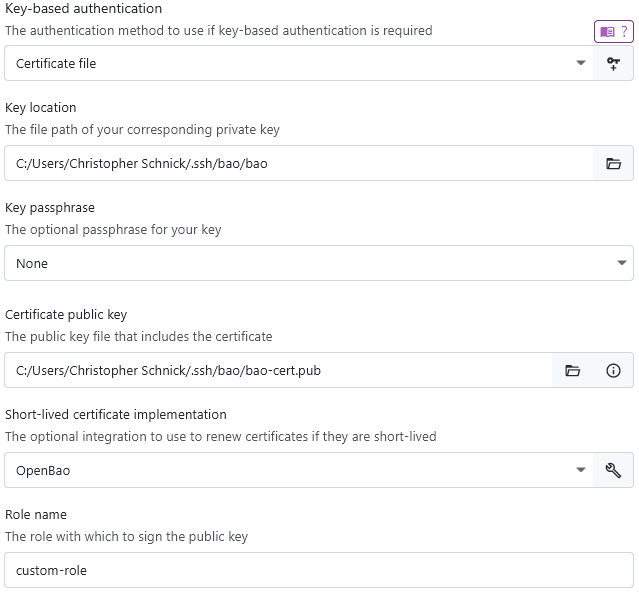
In addition to the private key file, you have to specify the signed public certificate key. If your key is following standard naming procedure with the -cert suffix, this should be filled in automatically.
Short-lived certificates
If your organization is making use of short-lived certificates which are regenerated every couple of days/weeks, you can configure an automatic renewal process as well. On every launch, XPipe will first check the validity period of the certificate. If it is expired, you will see a dialog like this:
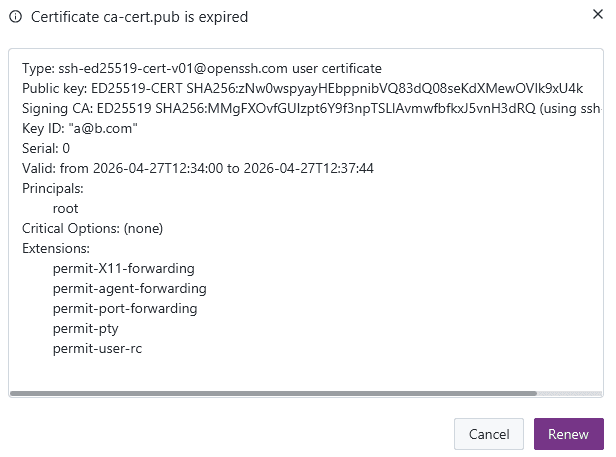
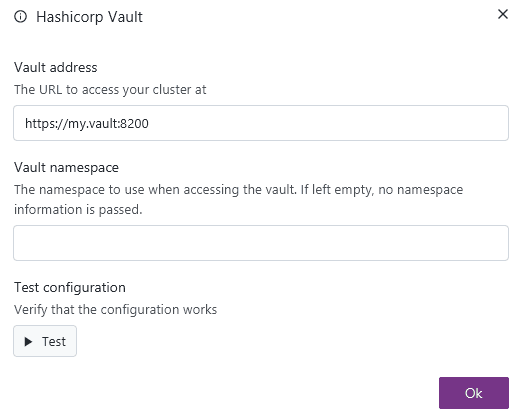
If you have a renewal method set, then XPipe will run this method to generate a newly signed certificate automatically. This currently supports Hashicorp Vault, OpenBao, and a custom command that can be run. For Vault and OpenBao, this requires configuration of the server details and the vault or bao CLI tools to be installed on the system.
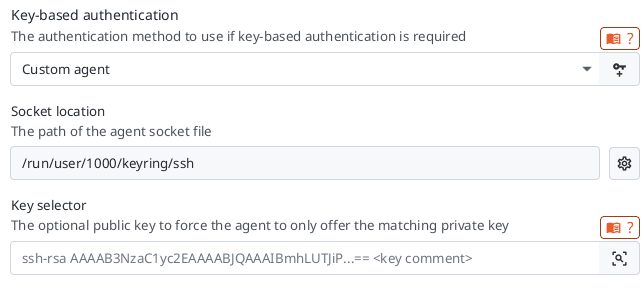
Custom agent (Linux & macOS)
On Linux and macOS, you will have access to the custom agent option as on these systems, any custom agent will use a different location for the socket. The custom socket location can be configured in the settings menu:

This is suitable if you are using a niche agent that is not supported out-of-the-box by XPipe. You can then use this agent just like others:
GPG Agent
If you have configured GPG keys that support authentication, you can choose to provide them to the SSH client via the gpg-connect-agent:
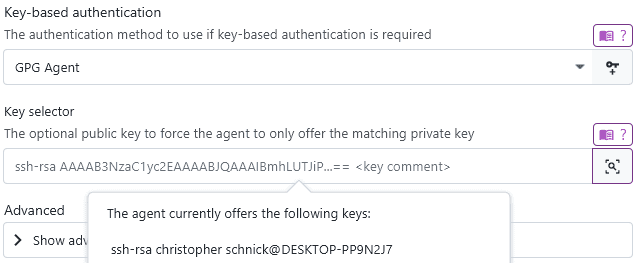
This option requires gpg to be installed on your local system. XPipe will automatically enable SSH support for the gpg agent if not enabled yet and restart the gpg agent daemon with the correct settings.
This option will only show up if you have the GPG agent and gpg installed on your local system.
Pageant
Pageant is the agent of PuTTY. If you have a lot of keys stored in the .ppk format, this option might bridge the incompatibilities between .ppk keys and OpenSSH. For more details, see the PuTTY section.
On Windows, due to the nature of pageant, it is your responsibility to have it running correctly as you manually have to specify all keys you would like to add every time it starts. If it is running, XPipe will pass the proper named pipe via -oIdentityAgent=... to ssh, you don't have to include any custom config files.
On Linux and macOS, in case your identities are stored in pageant, the ssh executable can use them if the agent is started. XPipe will automatically start the agent process if it is not running yet and pass the socket to SSH.
This integration also supports pageant instances from other variants of PuTTY like PuTTY-CAC.
This option will only show up if you have pageant installed on your local system.
Other external auth
This option will permit any external running identity provider to supply its keys to the SSH client.

You should use this option if you are using any other type of password manager agent or other type of auth configured in your local SSH config file.
XPipe will not interact with any external agent in this case, it will just allow any configured keys, agents, pkcs#11 providers, and external programs to supply keys to the SSH client. You will have to make sure that everything you want to use is running beforehand and configured correctly.
Other auth types
In case your authentication method is not covered at all by the available predefined methods, you can still choose to use the additional SSH options field to supply any arbitrary auth config data to SSH. This can be a custom agent configuration, a custom Pkcs11Provider option, a custom SecurityKeyProvider option, and more.
Generating keys
If you don't have an existing key at hand and instead want to configure a new key for a system to authenticate with, you can create one in the keygen menu, which you can find at the keygen button:
This will open a dialog where you can configure the generation parameters for a new key. The keys are generated via the installed OpenSSH ssh-keygen CLI tool, so you can be assured that the keys are generated in a cryptographically secure manner. This also support FIDO2 smartcard-based keys:
Once the key is generated, it will be automatically placed in the open connection configuration.
Public key handling
While you only need a private key for authentication, keeping track of the associated public keys is important as well.
For identities
If you want to add an identity with this keypair as an authorized key to another system, you will need the public key. You can automatically generate and store the public key for any supplied private key automatically with the generate button in the public key field:
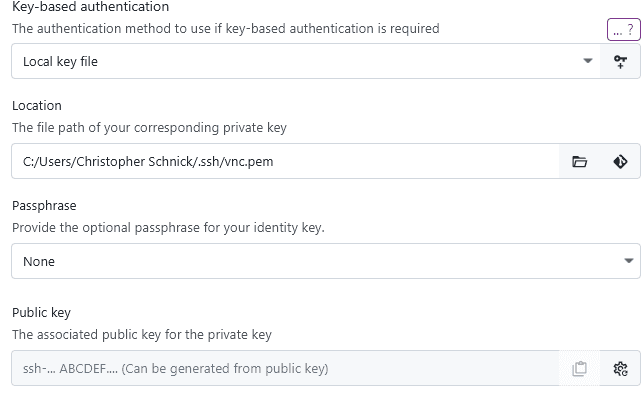
This might prompt for your passphrase if the key has one.
For agents
Another important area where public keys are important is for SSH agents. Without specifying the key name or public key identifier of the key you want to use from the agent, the default behavior of an agent is to try all available keys one-by-one. This can lead to authentication failures if your agent contains too many keys. It can also leak your key to systems you didn't really intend to provide with a specific key.
The solution to this is to specify the name or public key when using an agent in XPipe. This will force the agent to only use the one matching key and not accumulate unrelated authentication failures. Any agent configuration in XPipe contains a field for this, including a selector to quickly retrieve the key identifier from the list of available keys.
For password manager SSH agents, XPipe also might support the readable key name instead of the public key if the agent supports that. If it does, the automatic selector will fill in the name of the key.
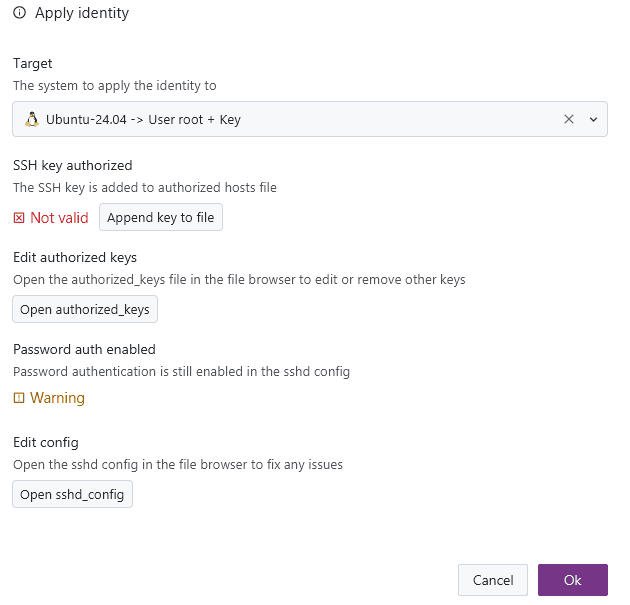
Applying identities
When you create an identity entry that includes your keys, you can apply this identity automatically to a system:

This allows you to quickly perform a key rotation or configure new systems with key authentication.
The process of changing the authentication configuration of a system is not always one simple step. So the dialog is a comprehensive overview of what is needed to apply a certain identity to a remote system, with various quick-action buttons and notes. This gives you still full manual control of what should be done and an overview of what is required prior to doing so.
Two-step connections
XPipe utilizes a two-step approach when connecting to a remote system. Essentially, the first connection will be opened in the background to set everything up with init scripts etc. This is also used to validate whether we can actually connect to the system in the first place. If everything is working correctly, and any init scripts are prepared, the first connection is closed, and then a second connection is opened in your terminal.
Effects
As a result of this approach, some authentication systems might prompt twice for any authentication if they do not support caching or reusing the same authentication tokens for a short period of time. An example would be an SSH connection setup with two-factor authentication. When opening such a connection with XPipe, it might ask you for an authentication code twice. If the authentication policy does not allow reusing authentication codes for a short period, you might have to wait until a new authentication code is generated.
XPipe tries to optimize the number of required connections in the background, so it should only require a double prompt once in a while.