
Team vault
Role-based access control for teams
Introduction
By default, XPipe starts out with an empty vault that does not have any passphrase lock, meaning that you can start XPipe without having to unlock it. This default vault does its best at encrypting the contained data, however, this is not as secure as giving it a custom encryption passphrase that only you know.
You can do this in the vault settings menu:
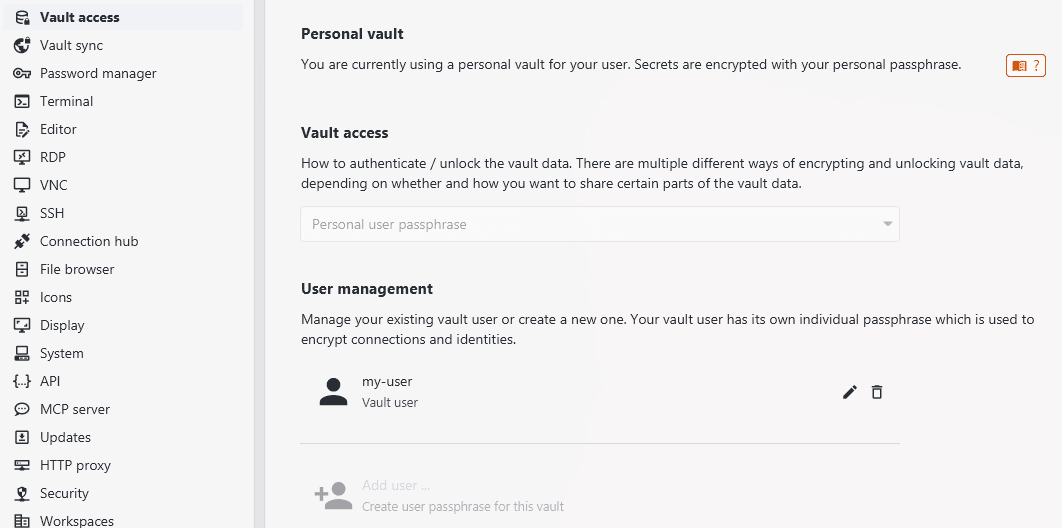
Once this is set, XPipe can encrypt all data with your personal key. A team vault is the continuation of this idea where multiple users have access to the vault. To manage this, a team vault uses role-based access control (RBAC) so that you can manage who has access to what. With this setup, multiple users can work on the same vault data while having restricted access to some connections and identities. To have multiple users sync the vault data, the git synchronization has to be configured.
A team vault enables fine-grained access control. However, a team vault is optional, meaning that if you are using XPipe with multiple users, it is not required to be configured. For example, if all team members should have access to all connections and identities, then a team vault isn't needed. The same applies for when you are just using individual local identities, as those are not synced and do not require any fine-grained access control.
Identity scope
Having a vault role configured enables you to modify the scope of identities and associated connections. Without one, those identities are available to everyone with access to the vault.
You can control whether any identity should be available only for certain roles or all roles in a team vault. If you don't use a team vault, this option is greyed out.
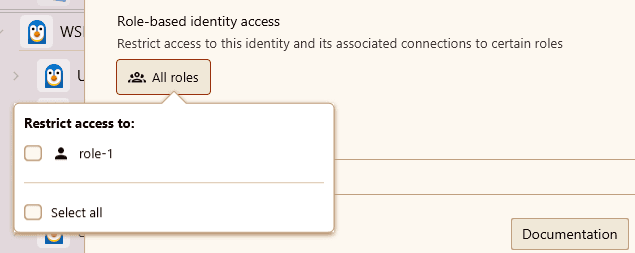
This setting is visible in the connection hub where personal (= only available to your user) and global identities (= available to all users) have different descriptions:

If an identity is not available to certain roles, then the identity will not show up for other users who don't have at least access to one role allowed role. Any connections using this identity will also not be accessible. This allows you to restrict access to connections and identities, even in a shared team vault.
Configuring a connection to use this role-based identity will automatically make XPipe encrypt the connection itself and all subconnections with the role's secret key as well. This will result in only the role having access to the identity and all associated connections. Anyone without access to the role's secret key can't decrypt the data. Any kind of key files associated with identities are also added to the repository using the role's key for encryption when needed.
For more information, see the identities docs.
Role management
Each role has its own unique secret key to encrypt the data with. The RBAC within XPipe works on top of your existing RBAC within your organization via different integrations. For example, in the case of the password manager integration, the distribution of the individual role secrets can automatically be handled via your password manager, as that one probably supports RBAC already.
Essentially, you configure a few randomly generated passphrases/secrets in your organization password manager and distribute those along your various roles you want to create. Then, everything in XPipe will work on top of this existing RBAC. The level of access to a role is then automatically defined via the availability of the role secret in the password manager for each user. If you are given access to a new role in your password manager from your organization admin, you can just restart XPipe and you will have automatic access to the data of that role as well. The same goes with offboarding from a role or alltogether.
Setup
To start off, each team member first has to sync to the same git repository. With no team vault settings configured yet, all members who sync with that repository will have full access to the same connections with this configuration.
You can then configure the vault authentication in the Vault Access settings menu. First, you can enable role-based authentication.
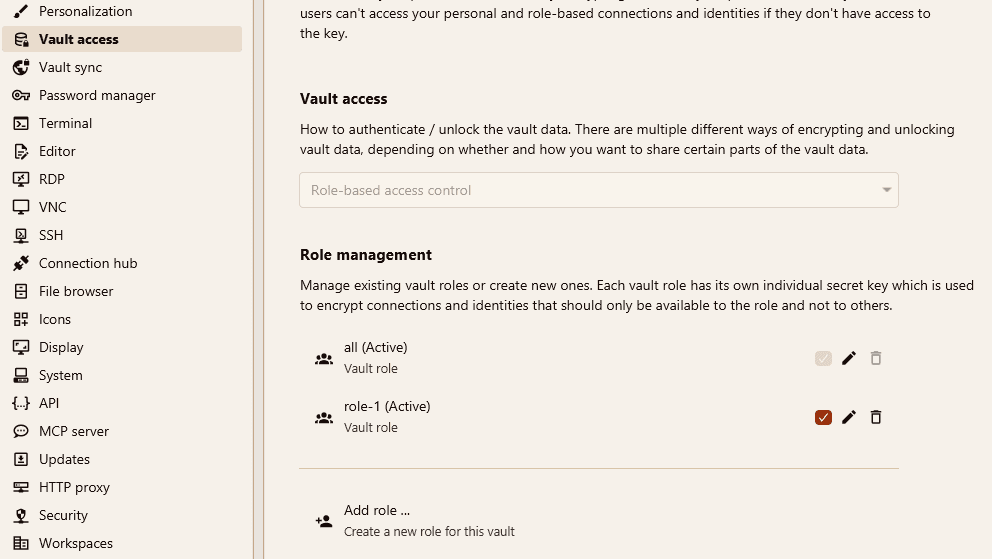
Creating roles
Each team member must have access to a supported password manager. Assuming that the secrets in that password manager are managed by an organization administrator, they can make the group secret available to group members in the password manager. For details on how to use password managers in XPipe, see the password manager page.
Each role has its own unique secret key to encrypt the data with. The RBAC within XPipe works on top of your existing RBAC within your organization via different integrations. For example, in the case of the password manager integration, the distribution of the individual role secrets can automatically be handled via your password manager, as that one probably supports RBAC already.
The first step is to create the all role, which is the base role for anyone that should have access to the vault. Your organization administrator should create an entry in your password manager and make it available to all vault users in the password manager. Then, you can create this role by selecting the created secret:
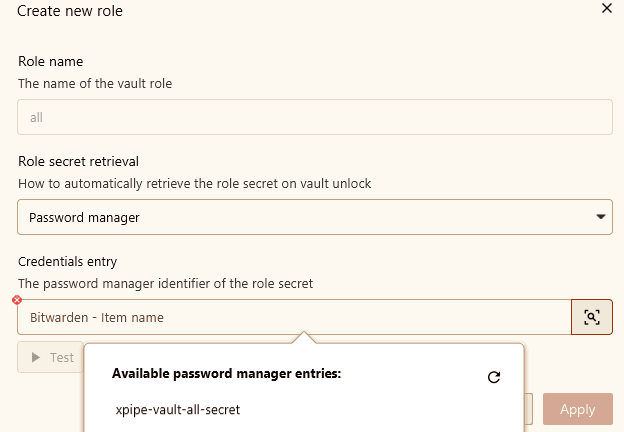
This operation might take a bit. Once it is done, you can create further roles as needed:
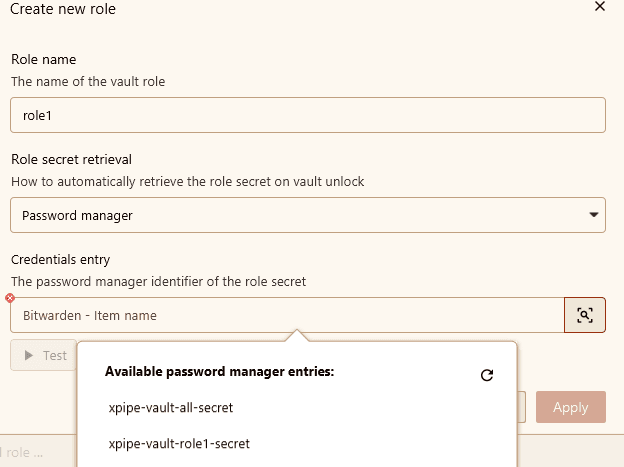
Unlocking the vault
Now, when you start XPipe and unlock the vault, XPipe will automatically connect to your password manager to retrieve those role secrets to decrypt the vault data. If everything works out, XPipe will only ask you for your password manager unlock and then start up. If, any role secret retrieval failed, you will receive this message:
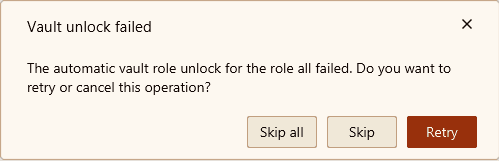
This means that the secret key for this role is unavailable. You can skip this error, but you will not have access to any vault data for this role. This error could mean that your password manager failed, you no longer have access to the role (i.e. it was removed by an admin from your password manager) or the role secret was changed.
Enabling and disabling roles
On unlock, XPipe will try to use all enabled roles. If you don't want to unlock a certain role because you don't have access to it or your access was just removed, you can prevent XPipe from trying to unlock the role each time by disabling it. You can uncheck the checkbox for a role to do this:
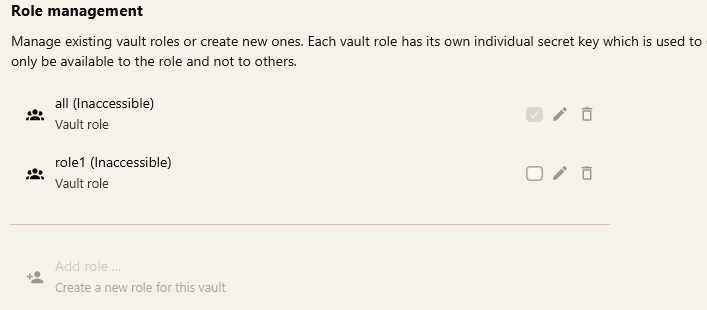
XPipe will then only unlock the enabled roles on your system.
Changing secrets
If, at a later date, you want to change the role secret key you have access to, you can do so at the edit button for the role entry. This action will re-encrypt the entire vault data and will take a while as this is a compute-intensive operation.
You can also delete a role if you have access to it. This will perform the same operation with the main difference that all role-based connections will be re-encrypted to remove the specific role secret key from it.
Merge conflicts
When working in a team, an occasional merge conflict might occur when another user pushes changes while your local XPipe instance is running. XPipe will automatically check in the background if someone else pushed something to the remote and will attempt to perform a fast-forward merge automatically. You will see this notification when this happens:

In most cases, you won't have to do anything as it can be handled automatically. However, if you and another team member modify the same connection configuration at the same time, you might receive a merge conflict error that can't be solved automatically. In this case, you can choose between either overriding your changes or the external changes.
Central API server
By default, the nature of XPipe and the git vault is decentralized, meaning that there isn't a central backend server to manage your vault. This makes it a bit complicated in enterprise environments where server changes should be propagated to a synced vault automatically via for example the HTTP API, as there is no central server to send those vault update requests to.
You can deploy the XPipe Webtop container as an API server to have a central server that is linked to your vault and can handle connection updates via the API without any user involvement.
Additional considerations
A team vault is essentially just a git repository consisting out of files that are encrypted with various keys. There is no database or other service involved.
History
Since a git repository comes with a full history, this means that you will have to take that into consideration when looking at the effects of adding a connection or identity. If you accidentally add an identity that is accessible to all users when it should only be available to a certain role, you can't easily delete this from the git history once it is pushed. Even if you overwrite the remote repo via a force push, the local clones will still have this data if they pulled the changes at some point. The local clones can overwrite their local changes via the built-in merge conflict resolver of the synced vault, however they don't have to.
If you want to avoid any such accidents, it is best to switch the sync mode to manual. With this, changes will only be pushed once you made sure that everything is correct. If it isn't, you can just git reset --hard <ref> the local vault to delete the locally made commits and try again before pushing.
Trust
The authentication system for encryption and decryption is not the most complex system you will find when compared to other solutions. It is designed to be relatively simple and robust. Each team member has full control over all connection entries they have been granted access for, meaning that they can modify them, delete them, and inspect the used passwords and keys for them. There is no fine-grained permission system akin to an administrator only granting something like read-only permissions to certain connections. Each team member has to be trusted with the connection access that they are given.
If you are looking to minimize possible leaks of secrets in this scenario, using security keys like Yubikeys for server authentication is the best option. This will prevent the possibility of any used private keys being leaked when an individual user's system is compromised.
Multiple vaults
A workspace is a completely separate data storage location, independent of others. It lives in its own directory on your local machine and has its own connections, settings, and vault. They can be created in the settings menu:
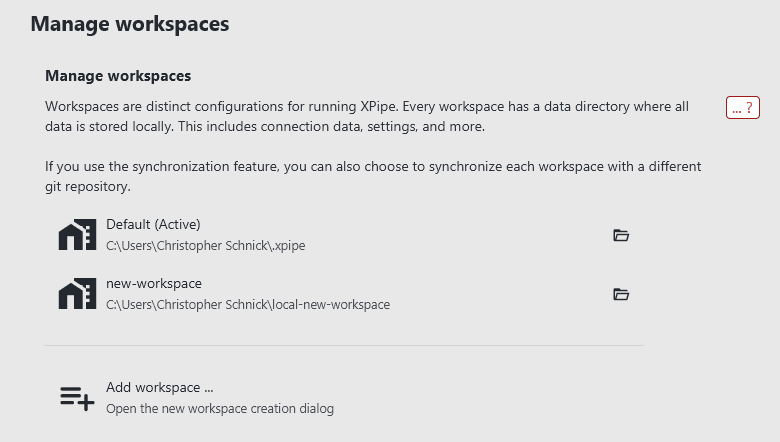
For fine-grained access control, like a few team members having access to a few specific connections outside of the normal role borders, you can try using multiple workspaces. In many cases, a separate workspace with a separate sync repository configured is the best option to solve these cases.
For more info, see the workspaces page.